
Today, we are going to create a small but customizable timer using Javascript.
We will learn how to create a javascript class, interact with the DOM and animate an SVG.
You can find the source code on the Github repo, play on codepen or simply check the demo.
In this project, we will learn how to:
- create a vanilla javascript class
- interact with the DOM,
- use CSS variables
- animate an SVG
Let’s go!
For this tutorial, you only need Node and NMP installed on your computer. To compile the project, I’ll use ParcelJs to create an easy environment to interact with.
Initialize the project
First, create a Timer folder and initialize the Parcel project:
npm install --save-dev parcelLet’s also add the SASS compiler :
npm i --save-dev @parcel/transformer-sassVery simple ! Then we create our /src folder with an empty index.html file. Here is the project structure:
Timer/
├─ node_modules/
├─ src/
│  ├─ js/
│  │  └─ index.js
│  ├─ scss/
│  │  └─ style.scss
│  └─ index.html
├─ package.json
Now, let’s update or package.json to add the script needed to run Parcel. (find more details on the parcel page):
{
  "name": "timer-js",
  "version": "1.0.0",
  "description": "A Javascript Class for a basic timer",
  "scripts": {
    "start": "parcel src/index.html --open",
    "clean": "rm -rf dist/*",
    "build:parcel": "parcel build src/index.html --no-content-hash --no-source-maps --public-url ./",
    "build": "npm run clean && npm run build:parcel"
  },
  "devDependencies": {
    "@parcel/transformer-sass": "^2.16.0",
    "parcel": "^2.16.0"
  }
}
You can now run
npm run startThis will open a new development server at http://localhost:1234/
Parcel also watches your files, so every time you save a change, it automatically updates the /dist folder and reloads the page.
Now let’s setup the HTML first: Create a basic index.html page.
Note how we import our local style.scss file as parcel handles Sass compilation.
Make sure you add type=”module” to the js import, since we are going to use ES module imports in our code
<!DOCTYPE html>
<html lang="en">

<head>
  <meta charset="UTF-8">
  <meta name="viewport" content="width=device-width, initial-scale=1.0">
  <title>Timer Js</title>

  <!-- Direct SCSS import with Parcel -->
  <link rel="stylesheet" href="./scss/style.scss" />
</head>

<body>
  <div class="container">
    Our timer will go here
  </div>

  <script src="./js/index.js" type="module"></script>
</body>

</html>
Now that the base is done, let’s code!
Add the timer to the DOM (HTML-CSS)
First, we need to understand how we want out timer to look.
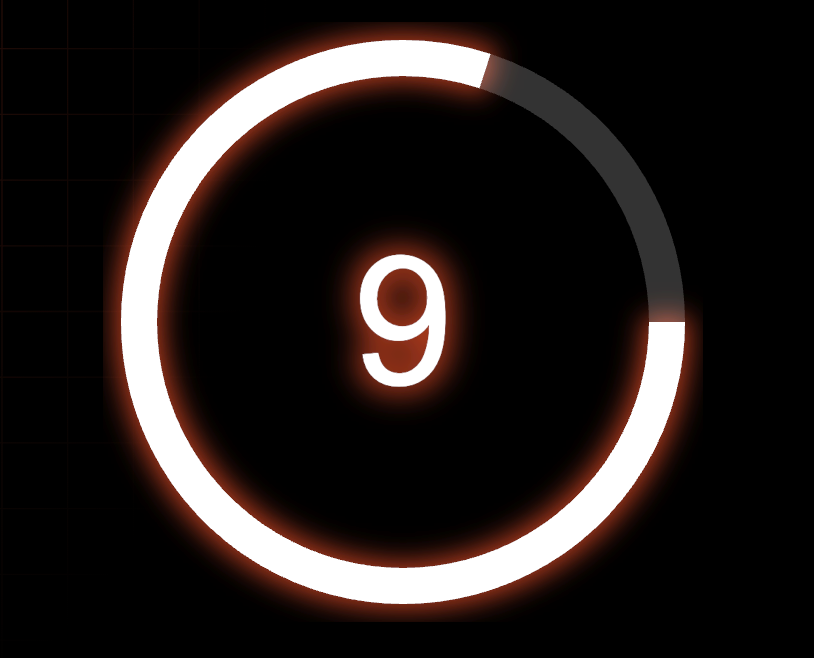
It consists of:
- an animated circle
- a number
Nothing crazy but for the circle, we are going to use some SVG properties to animate it: The HTML will look like
<svg class="timer__svg " viewBox="0 0 50 50" xmlns="http://www.w3.org/2000/svg">
  <circle class="timer__svg__progress" cx="50%" cy="50%" r="22" />
  <circle class="timer__svg__progress-bg" cx="50%" cy="50%" r="22" />
</svg>
We have to circles with the same size: one for the animation, the other one for the background.
The viewBox=”0 0 50 50″ means: a 50 svg unit wide x 50 svg unit tall, starting at the top left corner (0,0)
Now let’s focus on the animation.
cx and cy define the center point of the circle, so setting them to 50% will center it.
r is the radius, here, 22 svg unit, which leaves a bit of padding naturally around the circle. Needed to avoid cropping the circle if we have any effect, or a larger stroker.
Basic circle styling
First, we want a border and no fill color:
.timer__svg__progress,
.timer__svg__progress-bg {
  stroke: var(--timer-color);
  stroke-width: 3px;
  fill: none;
}
Note that we use a CSS variable for the stroke, so it can be customized easily later.
SVG animation properties
For the animation, we are going to use 2 SVG-specific CSS properties:
- stroke-dasharray: defines the pattern of dashes and gaps. Example, a stroke-dasharray: 5 will mean a repetition of 5 units painted, 5 units empty.
- stroke-dashoffset: the starting point of our stroke. We will animate this so it looks like it’s getting smaller (it’s not, the pattern is simply sliding along the path)
And now, it’s just a bit of math. Basically, we want our stroke-daharray to be exactly the circle’s perimeter, and then animate it.
The calculation is for the circumference of a circle is… C=2πr
In our case: 2 * 3.14 * 22 = 138.16.
Of course, we will calculate in javascript, but you can already try this in your CSS:
stroke-dasharray: 138.16;
stroke-dashoffset: 70;
And you will see a half-closed circle. Try to play with this stroke-dashoffset number to see it moving along.
If you try this, the animation will not be fluid. You can simply add a transition in your css to fix it:
.timer__svg__progress {
  transition: 1s linear;
}
The reset of the CSS is not so complex, you can check the source if you want the complete styles.
The javascript Timer class
What we want is to be able to add a new timer simply by instantiating a JS class, and expose a few methods to control it:
let myTymer = new Timer(100000, /* styling options*/);
myTimer.pause();
myTimer.play();
myTimer.reset();
So let’s create a class. The base is pretty simple:
the fields we need, a constructor to initialize them, and a method to prepare the timer and the DOM
export default class Timer {
  // The fields we need through or class
  isStarted = false;
  isPaused = false;
  timerMax;
  timerInterval;
  timerSeconds;
  options;

  // constructor
  constructor(timeInMs = 10000, customOptions = {}) {
    this.timerMax = timeInMs;
    this.timerSeconds = this.timerMax;

    // the options contains the selector. So we can have a custom one
    this.options = {
      selector: '.timer',
      ...customOptions,
    }

    this.initTimer();
  }

  initTimer() {
    // instanciate or DOM elements
    this.$timerComponent = document.querySelector(this.options.selector);
    this.$timerTime = this.$timerComponent.querySelector(".timer__time");
    this.$timerSvgCircle = this.$timerComponent.querySelector(".timer__svg__progress");
    this.$timerSvgCircleBg = this.$timerComponent.querySelector(".timer__svg__progress-bg");
  }
}
Now, we have basically all the variables we need through our class.
Starting the timer
Let’s now create a method to start the timer. We’ll use a simple approach (not the most accurate, to be honest): we will set an interval and update the timer every 1000ms.
startTimer(customStartTime, onTimerFinished) {
  this.timerInterval = setInterval(() => {
    this.timerSeconds = this.timerSeconds - 1000;
    this.animTimer(this.timerSeconds);
  }, 1000);
}
Let’s also have a method to clear the interval when we need to stop it:
clearTimer() {
  if (this.timerInterval) {
    clearInterval(this.timerInterval);
  }
}
Animating the circle
As explained in the CSS, we need to know:
1/ the percentage remaining (if the timer was 10s, and there are 8s remaining, we have 80%).
The formula is simple: Remaining Time* 100 / Time Max.
We can also invert the ratio to animate it the opposite way (20% spent instead of 80% remaining)
getTimerPct(msRemaining) {
  const { circleReverse } = this.options;
  const ratio = !circleReverse ? 100 : 0
  return ratio - (msRemaining * 100 / this.timerMax);
}
2/ The circonference of the circle (C=2πr)
const circleSize = 22 * 2 * Math.PI; // 22 = r in svg circle3/ Now, we just update the stroke-dasharray, as we saw in CSS
animTimer(msRemaining) {
  let timerPct = this.getTimerPct(msRemaining);
  this.$timerSvgCircle.style.strokeDashoffset = (timerPct * circleSize) / 100;
}
We can add a destroy to fully clean up the timer instance.
This is mostly to clear the interval and free browser memory. We can use our clearTimer method.
destroy() {
    this.clearTimer();
}
And that’s it
Basically, with this, you now have a fully working animated timer.
Improvement
If you checked the source, you might notice a few additional features.
For example, you can add a class when the timer is between 3 and 0 seconds, to make it red and have a flashing animation.
startTimer(customStartTime, onTimerFinished) {
  this.timerInterval = setInterval(() => {
    this.timerSeconds = this.timerSeconds - 1000;
    this.animTimer(this.timerSeconds);

    if (this.timerSeconds < 4000) {
      this.toggleFlashing()
    }
  }, 1000);
}

toggleFlashing(add = true) {
  if (add) {
    this.$timerComponent.classList.add('flashing');
  } else {
    this.$timerComponent.classList.remove('flashing');
  }
}
And the corresponding css
.flashing .timer__svg__progress {
  stroke: var(--timer-error-color);
  animation: flashing 1s infinite;
}

@keyframes flashing {
  0% {
    opacity: 1;
  }

  100% {
    opacity: .5;
  }
}
Another cool enhancement is allowing different styles and animations.
In you constructor, add more options:
constructor(timeInMs = 10000, customOptions = {}) {
  //… rest of the code
  this.options = {
    selector: '.timer',
    circleAnimation: 'default',
    circleReverse: false,
    textAnimation: undefined,
    textReverse: false,
    effect: true,
    ...customOptions,
  }
And when animating your timer, use these options to select a specific style.
animTimer(msRemaining) {
  const { circleAnimation } = this.options;

  if (this.isStarted && animationMap[circleAnimation].startOneSec) {
    msRemaining -= 1000
  }
  let timerPct = this.getTimerPct(msRemaining);

  animationMap[circleAnimation].animate(this, { circleSize, timerPct });
}
And create an animation map to handle different animation setups.
Example here with a “default” animation, and a “step” animation
export const animationMap = {
  'default': {
    init: animationDefault,
    animate: animationDefault,
    startOneSec: true
  },
  'step': {
    init: animationStep,
    animate: animationStep
  },
}


function animationStep(ctx, { circleSize, timerPct }) {
  const space = 2;
  const dash = circleSize / (ctx.timerMax / 1000) - space;

  const pattern = `${dash} ${space} `;
  let stroke = pattern.repeat(ctx.timerMax / 1000).trim();
  stroke += circleSize

  ctx.$timerSvgCircle.style.strokeDasharray = stroke;
  ctx.$timerSvgCircleBg.style.strokeDasharray = stroke;
  animateCircle(ctx, { circleSize, timerPct });
}
You can see 3 properties in animationMap():
- Init: if your animation needs a specific styling on init.
- Animate: the function that animates the circle.
- startOneSec: Some animation needs to start one second earlier to display correctly.
For example, the default animation should begin immediately, so we adjust the timer visually without changing the actual time.
Here you go! You now have a fully customizable, animated timer using JavaScript, CSS, and SVG.
Feel free to check the source code for the full implementation and even more features!